

Timpani Tuning
by Jan Evans
WHEN IS IT TIME TO CHANGE TIMPANI HEADS?
Change timpani heads when the tone starts to sound dry or dead or the pitch becomes “false” meaning it is impossible to fine-tune the head and obtain a clear pitch. Please refer to the Evans Timpani Head Sizing Chart to determine which head size is correct for your timpani.
STEP ONE: PREPARATION
- Place a block of wood under the toe of the pedal to prevent it from snapping forward when the old head is removed.
- Remove the old head and completely clean the entire bowl and support mechanism. Make sure that the bearing edge (lip) is smooth and clean at the point of contact for the head. An extra-fine steel wool #0000 can be used to gently clean the bearing edge. (If your timpani already has Teflon tape on the bearing edge, and it is not damaged or peeling, then do not remove it or use steel wool on it. If the Teflon tape is damaged or peeling, remove it before using steel wool on the bearing edge.) Remove dirt and old lubricant from the tension rods and apply fresh lubricant (lithium grease).
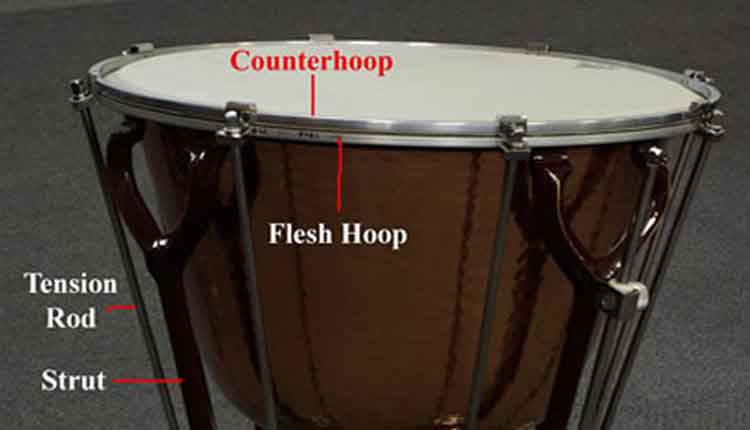
- Line the counterhoop with adhesive felt, rubber, or moleskin to eliminate noises (buzzing) that occur from contact with the counterhoop and the head.
- Lubricate the bearing edge by spraying a thin, even layer of Teflon spray along the entire bearing edge. Teflon spray is available through percussion specialist retailers or hardware stores.
STEP TWO: MOUNTING THE HEAD
- Place the new head on the bowl and replace the counterhoop, checking to insure the space between the hoop and the edge of the bowl are equal around the entire perimeter of the drum. Replace the tension rods and finger-tighten them until they make contact with the hoop. DO NOT APPLY PRESSURE TO THE HEAD YET!
- Following the cross lug sequence (pictured right), begin to apply tension with the timpani key by turning each rod 1 (one) complete revolution. After each rod receives one full revolution, repeat this procedure.
- Next, using the same sequence but in smaller increments (1/2 turns), tension the head until it reaches the lowest note in the playing range (as suggested by the drums manufacturer). At this point, remove the block of wood from beneath the pedal!
STEP THREE: CHECKING
- Use a Drum Dial (available from most major music and/or percussion retailers) that measures the head pressure at each tension point around the bowl. Be sure when using the drum dial to place it on the head lined up directly with each tension rod. The drum dial should be placed the same distance from the bearing edge at each tension point. Make small adjustments to each rod until the tension is the same at each.
- Set the pedal tension to the upper notes in each drums range (as suggested by the drums manufacturer) and let it sit at least 24 hours before fine tuning.
STEP FOUR: CLEARING THE HEAD
The head is said to be “clear” when all spots at each tension lug are in tune. It may be helpful to use an electronic chromatic tuner in conjunction with the Drum Dial to fine tune.
- Gently put 1 or 2 fingers or a small pad in the middle of the head to help focus your perception of the fundamental pitch.
- With the drum tuned to a mid-range pitch, play a few tones loudly at the beating spot to get a sense of the overall pitch of the drum. Following the cross lug sequence, softly tap at each tension lug (with a medium hard timpani mallet) and listen closely for the pitch at that isolated area to determine if it is flat, sharp, or in tune with the overall drum pitch at the beating spot.
- Start with the area that is most out of tune and always try to tension up to the new pitch when fine tuning. If you are lowering the pitch, bring the pitch lower than necessary, then up to the desired pitch. Repeat this procedure at opposite lug points around the drum. It is best to go around the drum several times, making several small adjustments rather than making large tuning changes all at once.
- After you have cleared the head, check the range of the drum make sure its within the manufacturers specified range. If its necessary to drop the tension to capture the bottom end of the range, but sure to adjust all the tension rods equally using the cross-lug sequence.
- The pedal should be checked for smooth operation and to make sure that it holds pitch at each note in the range. Most timpani have a spring tension adjustment mechanism that can be adjusted to insure the pedal holds pitch. See your owners manual for details on how to use it. It may take some time until a new head begins to sound its best. Constant adjustment will be necessary during this break-in period.
TIMPANI TUNING RANGE
The practical range of a timpani is a perfect 5th. Most drums with a good head will easily play from a half step below their normal range to a step above it.
32″ range D – A
30″ range E – B
29″ range F – C
28″ range F – C
26″ range Bb – F
25″ range Bb – F
23″ range Eb – Bb
20″ range F – C
Sponsored by Jan Evans
For more articles and information please visit Jan Evans Tuning/Care