

Top 13 Timpani Questions for High School Band and Orchestra Conductors
Steven Schweizer

Timpani Tone and the Interpretation of Baroque and Classical
Music Now available at OUP Here
In my 34 years of playing timpani, I’ve had the opportunity to work with and/or observe high school band directors and their timpanists. There have been recurring questions that bear re-asking. Band directors are faced with the common challenges of buying, keeping, and maintaining school-line (i.e. non-professional) timpani. Many conductors have little timpani instruction, and what they know comes from on-the-job training, talking with percussionist coaching their percussion sections, workshops, conventions, and discussions with other band directors. In this article, I will pose and answer 13 questions and provide one definitive answer to them. For those who are knowledgeable and skilled in the percussion, I hope that you can find something that further enriches your appreciation of the timpani.
I will admit that no conductor has ever asked me the first question: what kind of sound do I want from my timpanist? But as you will see, the answer to this question helps us thoughtfully answer other questions that are commonly asked. Let’s start with that question.
1. What kind of sound do I want from my timpanist?
The concept of timpani sound is complex and every conductor with whom I have played has some idea of what sound he wants the timpanist to project. Whole schools of thought have been built around producing a particular sound. The “Cloyd Duff”, the “Concertgebouw of Amsterdam”, and the Viennese (Vienna Philharmonic Orchestra) sound are examples.
Timpani sound is shaped by many factors-physical and musical. The make and bowl shape, the playing style (commonly called German, French, or American), the manner in which timpanists grip the sticks, the kind of mallets, and the style of music (classical or romantic, for example) all shape timpani sound.
How do you decide what sound is best for you and your band? I have three suggestions. First, decide if you want your timpanist to “blend” with your ensemble or to “stand out”. If you prefer a blending sound, the timpani will have a “presence” that blends with and does not over power the ensemble. If you prefer a sound that “stands out”, you will want a sound has a distinctive, focused, percussive sound. This sound will cut through the ensemble.
Second, you can listen to the timpani on some CDs to decide on a sound. If you want a blending sound, listen to some Cleveland Symphony Orchestra recordings between the mid 1940s and the late 1980s or the Atlanta Symphony Orchestra recording from the 1990s to present. If you want to a darker, more percussive sound, listen to recent recordings of the Vienna Philharmonic.
Third, you can listen to bands and orchestras at competitions, festivals, or other concert venues. If you like the sound you hear, approach the timpanist and band director and ask these questions:
- what kind of timpani are used,
- how does the timpanist grip the stick,
- what kinds of sticks does the timpanist use,
- what is the timpanist’s general playing style (sitting or standing),
- how proficient is the timpanist.
By proficient, I mean is the timpanist seasoned, has s/he studied with a professional timpanist or percussionist and does the timpanist play well and with ease? Complete the following form each band you analyze. (A word of caution, highly or minimally reverberant halls will skew the sound of the timpani to some extent. Be aware of this in evaluating the quality of the timpani sound you hear.)

After listening to a number of bands and completing the form, look for any trends. Do you like a particular kind of timpani, does a particular brand of mallet jump out and so forth.
After you have done these three things, you can choose the “sound” you would like to hear from your timpanist, and you may be able to identify timpani, mallets, and grip and playing style associated with that sound.
Resources
- For a fuller discussion of the acoustics of timpani, see my book, Timpani Tone and the Interpretation of Baroque and Classical Music at Oxford University Press See Here
- Richard K. Jones’s “The Well-Tempered Timpani” is a website that describes, in part, the acoustics of the timpani: See Here
2. What timpani should I buy?
The kind of timpani you purchase is one component of the sound you want to achieve. For the time being, I will not address the issue of price. First, bowl type is the important consideration. Today, bowls come in two basic shapes: parabolic and chambered or semi-flat bottomed. Parabolic bowls tend to produce a darker tone and chambered tend to be more translucent. “Hammered” bowls have a better tone quality than those that are not. Second, bowls that are suspended from hoop are generally superior to bowls mounted directly mounted to the struts. Third, there is universal agreement among serious timpanists that copper drums are tonally superior to fiberglass. For this reason, most band directors steer away from fiberglass. However, the lower priced fiberglass is sometimes the deciding factor for directors with few resources. Fourth, timpani with eight struts and tension rods are superior better than timpani with fewer struts and rods. A greater number of tension rods make it easier to clear (or tune) a head than one with fewer tension rods. More struts and rods add to the weight of the drum and this provides better timpani harmonics.
 Other factors that are important include tuning mechanism: post and clutch (block) or balance action. On the one hand, the post and clutch has a greater range than the balanced action. Since most timpanists do not play at the extremes (neither the lower most pitch nor the upper most pitch), the value of an extended range is questionable. If you purchase fewer than four drums, the extended range can help reach notes that are only accessible with a fourth drum. The post and clutch is a bit harder for younger timpanists to use, especially when tuning quickly. On the other hand, the balance action pedaling system is easier to use and the ranger of notes on each drum are adequate to most music written today. If the balance action knob is improperly adjusted, the pitch of the drum can raise or lower while the drum is being played. Properly mounting the head and adjusting the balance action knob can avoid this. Wheels on school-line timpani are important for two reasons: moving the timpani from place to place and anchoring the timpani when playing. All brands have timpani equipped with two wheels opposite the player. Others allow the timpanist to add a third wheel under the tuning pedal allowing for easier transportation. Tuning indicators are another convenient, if hot essential feature. Tuning mechanisms that are connected to the pedal assembly are superior to those attached to the side of the timpani. Base mounted indicator systems tend to be more accurate and sturdier. Those attached to the side of the timpani indicate pitch changes associated with the movements of the counter hoop. This system is so exposed to traffic that it can be more easily broken, and it is not as accurate as pedal mounted indicator systems. Finally, some timpani have a fine-tuning mechanism that permits the timpanist to make fine adjustments in the pitch. While some band directors are “purists” and expect their timpanists to rapidly change pitch by ear or by pedal feel, other band directors prefer to have a indicator system that permit the timpanist to quickly change pitches as needed. In this case, the young timpanist learns to tune by ear in private lessons. No tuning indicator is perfect and bands will play sharp or flat; for these reasons, timpanists need to be able to tune by ear. Tilting mechanisms allow the timpanist anchor the timpani on an uneven or slanting floor by raising the two front wheels. On a flat surface, raising the front two wheels also allows the timpanist tilt the head and thus play on the more tonal part of a cartwheel timpani stick. While tilting mechanisms are not found on school-line timpani, placing a 2″ x 4″ under the front wheels tilts the drum approximately 2″ and achieves the same purpose. Notching the top of the board allows the timpani wheel to securely settle into the 2″ x 4″ board and staple gunning a ribbed, rubber pad to the bottom of the board prevents the system from slipping on oak or other slick floors.
While there are numerous brands of timpani, Adams, Yamaha, and Ludwig timpani are the most popular for high school settings. Some manufactures allow for the band director to select bowl type and hammering. Other provide a “take or leave it model”. A local dealer, national percussion store, area band and orchestra teachers, and percussion blogs are good places to go to discuss the relative advantages and disadvantages of specific model timpani.
Resources
- Major online percussion dealers include:
Steve Weiss Music
Lone Star Percussion
Percussion Source - Links to timpani manufacturers:
Adams Timpani
Ludwig Timpani
Yamaha Timpani – Walter Light Dresden Timpani - Timpanist John Tafoya, Indiana University, maintains a website that includes timpani and other percussion gear for sale.
3. How many timpani should I buy?
Given the reality of modern band literature, four timpani are pretty standard. However, advanced music programs require five or more timpani. The standard diameters that most schools purchase are 32″, 29″, 26″, 23″, and 20″. Some manufacturers offer a 27″ and 24″ timpano. Both the 24″ and 27″ have the advantage of getting a better “d”. But they lose quality notes at top end of the drum’s range, and often a “d” on a 26″ drum can be played on a 29″ drum with conviction.
If the drums are not purchased in a set, it is common to buy them in this order: 26″ and 29″, 31″, 24″, and finally 20″. Since the 20″ drum is rarely used, some timpanists have substituted a 10″ roto tom or timp tom. The tone quality of a roto tom is remarkably similar to that of a 20″ timpano. This drum has a very focused pitch and is less resonant than a 26″ timpano. However, the roto tom cannot project the volume as well as a 20” timpano and more care has to be made to bring out the part.
With limited budgets and usual demands on band boosters to buy uniforms, finance trips, purchase percussion and marching band equipment, and so forth, it is often a challenge to buy a set of four, high quality timpani. In looking at their program and percussion section, some band directors make do with the best drums they can buy. Other conductors are able to buy a quality set out right. However, those who want to buy quality drums will often develop a plan to purchase quality drums over a shorter period of time: two this year, and two more over the next four years, for example.
Resource
For another perspective on how to sort out how many drums to purchase, see this Percussion Source article.
4. How should I protect my timpani?
Without doubt, protecting timpani is a challenge in any modern band room. There are several levels of protection that band director should consider. The first, and the simplest level of protection, is to use a timpani drop cover. These covers come in a full-length cover with nearly reaches the floor and a short skirt. Without doubt, the full-length cover is superior, protecting the bowl from scratches and light bumps. These drop covers are made of vinyl plastic or Cordura fabric. Cordura is by far superior to the vinyl plastic in providing protection from everyday bumps and bruises. In one school, a band mother sewed quilted covers. The second layer of protection is a “head protector”. This is a piece of Masonite lined with felt on one side and it covers the drumhead and bearing edge. This protection is doubly important since it protects the head from the damage of heavy objects that fall on it, and it protects the bearing edge of the bowl. The bearing edge or lip is the top-most part of the timpani bowl over which the head is mounted. If that bearing edge is dented, it will permanently prevent the timpano from being tuned. This first and second layer of protection will usually prevent head damage caused by a music stand falling into the head, a student stumbling and hitting the head with a trumpet or trumpet case or a malicious student seeing an opportunity to cut the head. All of these things I have seen and the damage to the head adversely affected the tone quality. The third layer of protection is a sign stating: do not place anything on this drum. A can of coke placed on a timpano covered with a head protector and drop cover is not going to damage the head. But the can sends the message that anything can be put on the drum, and “the wrong thing” could penetrate an exposed or covered timpani head or dent the bearing edge. The fourth level of protection is doing all the above and storing the timpani in their own cabinet or room after a rehearsal, concert, lesson, or practice session. The fifth and final level of protection is placing the drums in cases when they are in transit to a concert or competition site. Some manufacturers sell custom-made cases, but they can be built by a band booster using some imagination.
5. How should I move my timpani?
When timpani are moved or lifted, three things need to be done. First, the timpani should be put at their top note and the wheels unlocked. Raising the pitch to the top note reduces the possibility that the head will shift from its normal position during moving. While shifting may not harm the head per se, it gets the head out of alignment with the bowl. When a head is put on, it is “seated” or centered directly over the bowl and a circular crease is created where the head meets the bearing edge of the bowl. If the timpani head slips out of the crease, it moves its “center” and the head is not as resonant and is out of tune. Second, move or lift the timpano by the struts and not by the couterhoop of the drum. This ensures that damage is done neither to the counterhoop nor the head, and the head remains seated properly on the drum. Two people should move timpani if they involves lifting. Third, if the timpano has three wheels, one person can move the drums pushing or pulling it by the struts. Using the counterhoop to mover or steer the drum risks unseating the head. Finally, when the timpani arrive at their destination, pedal the pitch down to the mid-range of the drum.
Here is a hint when mounting our head to help your reseat your head should it be moved in transit. With the head off the drum, 1) take a permanent marker and place a black reference mark where the ends of the Teflon tape meet on the bearing edge or 2) make mental note of where the bowl’s seam is located on its bearing edge. After you have mounted the head, bring the tension down to the middle range of the drum. Look around the new head and find the reference mark you made on the Teflon tape or find the bearing edge seam. When you find it, put a permanent ink reference dot over the Teflon mark or bearing seam (this will be directly on top of the bearing edge) and then make a small “X” or other sign between the bearing edge and the counterhoop near this dot. Then place a dot opposite the reference dot; pace this dot where you can see the bearing edge “peeking” through the head. Then, move 90 degrees right and left and place a dot directly over the bearing edge peeking through timpani head. The result is you have marked the head at four points, directly over the bearing edge. If the head ever shifts out of the crease, take most of the pressure off the head, move the reference dot on the head over the Teflon or bear edge reference point, and then move the head so that each of the other marks are directly over the bearing edge. Tighten the head half way, see if the dots are over the bearing edge. If they are, you have reseated the head. If they are not, pedal down the tension on the head, shift the head slightly and return to mid-register on the drum. Repeat this procedure until the dots line up with the bearing edge faintly visible through the timpani head.
Resource
On maintaining and moving timpani, see the clip at Vic Firth’s website on maintaining timpani
6. What timpani mallets should I buy?
The choice of mallets is as important as the selection of timpani. Care should be taken in selecting and maintaining timpani mallets. What should a band director consider in purchasing timpani mallets?
The timpani are tonal and rhythmic instruments. Mallets are used to produce certain tones as well as the desired articulation. As a result, mallets come is sets of five or more pairs. Sticks are often labeled wood, super or ultra staccato (hard), staccato (medium hard), general purpose (medium), legato (soft), and very legato (very soft). Some manufacturers add specialty sticks to this list. Each mallet has a specific purpose in achieving the tone or articulation that is needed for the musical line. Therefore, conductors should make sure the timpanist has a complete set of sticks.
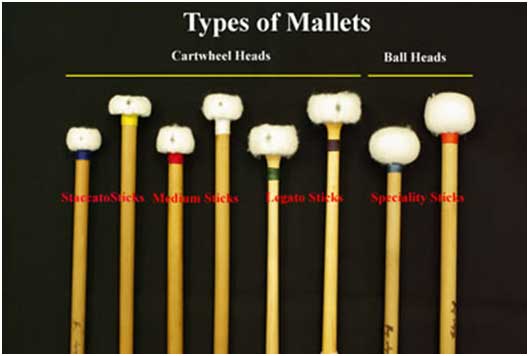
In considering sticks, the band director should consider two factors in particular: stick handles and mallet head design. First, sticks are made from heavier or lighter materials. Heavier materials include cherry wood or maple. These sticks, on the whole, produce a darker tone than do sticks that are made of lighter materials such as bamboo, carbon fiber, aluminum, and rattan. So, if you purchase timpani with parabolic bowls that have a much more darker tone, consider purchasing mallets that are a bit heavier. They will bring out the tonal characteristics of that drum. If you purchase timpani with semi-flat bottom bowls, a lighter stick made from bamboo, aluminum, or carbon fiber would bring out the tonal characteristics of that drum. Second, timpani mallets have round or cartwheel heads. Timpanists continue to argue which better. If you are going to tilt your drums, you might consider using cartwheel sticks. Using a large headed ball stick on a tilted timpano often produces an occasionally “false”, disturbing sound. On the other hand, if the timpani are played flat, either shape might work. Don’t be disturbed if a set of sticks includes mallets with bamboo and maple handles or round and cartwheel heads. The manufacture believes that the particular handle and head is necessary to achieve a particular sound.
In purchasing timpani mallets, there are several things you should consider before making your choice. First, you can refer to the “Timpani Sound Evaluation Form” you completed to identify mallets that might be associated with the timpani sound you like. Second, consider price. Generally the better, hand crafted sticks produce superior tone production and they are priced higher than other sticks (in the $40 – $50 range). If you find set of mallets you like but are too expensive for your budget, purchase the set in steps. First, purchase the general, staccato, legato, and ultra staccato mallets. This is the minimum you can get away with. Then purchase the rest (which will include wood and larger staccato mallets). If your program is really on a diet, purchase medium weight, balanced timpani sticks. Avoid sticks that are too heavy or whose heads are top heavy. A percussion dealer who handles a variety of timpani mallets can help you make the choice. Third, percussionists at local colleges and universities and local percussionists can make suggestions, too.
Resources
- For pricing and information on a wide variety of timpani mallets, see these dealers:
Steve Weiss Music
Lone Star Percussion
Percussion Source - For an introductory tutorial on recovering cartwheel timpani sticks (which also saves money and allows the timpanist to shape the sound of his or her mallets) see Amy Stubbs article at Percussion Source’s website
- The best instructional video on recovering ball and cartwheel sticks was made by Mark Yancich of the Atlanta Symphony Orchestra. It can be purchased at Professional Percussion Products
- See Dwight Thomas’s website for timpanist Cloyd Duff’s article on the importance of musicianship in playing the timpani
7. How can I protect my timpani mallets?
Timpani mallets, like violin bows, are crucial in producing the sound you want to hear. More often than not, when I go into a high school band room, I see timpani mallets scattered about, without a plastic case covering them, and their heads pretty scuffed up. The best mallet in the world will not perform well if it doesn’t keep its pristine condition. Therefore, there are several things you can do to keep and maintain timpani mallets. First, buy a stick case, or alternatively, a stick bag. I prefer the stick case because the hard case protects the stick better. Second, retain the mallet’s plastic bags and return the sticks to these covers after use. This will protect the mallet heads from becoming scuffed, thereby changing their tone quality. If you need to replace the plastic cover, a plastic newspaper sleeve works well. Third, clean the timpani head before playing. This prevents oils and dirt from matting the wool fibers of the timpani mallet. Fourth, place the sticks on a piece of satin cloth draped over a music stand, percussion table, or stick table. This prevents the heads from becoming scuffed during rehearsals or concerts. Fifth, do not use timpani sticks on cymbals or other percussion instruments. Timpani sticks are finely crafted to produce a certain tone and articulation and they are made specifically for timpani. Reserve them for that purpose. Finally, store the sticks in a locked cabinet. This will reduce the possibility another percussionist will use the mallets on other instruments.
Resources
See visit these dealers websites for a variety of timpani cases and stick bags:
Steve Weiss Music
Lone Star Percussion
Percussion Source
8. How do I know if my timpani head is bad?
A good timpani head has three aural characteristics: a definite pitch, a body of harmonic partials that give the timpani its distinct timbre, and a blossoming sound. Depending on use, the head may last from 6 months to two or more years if it is well maintained. When a brand new head has been properly installed and has been played for about a week, listen to it at the mid-register, (e.g. a “d”). You will hear a note 1) with a clear, distinct pitch that does not or raise or lower within five second after you strike the drum, 2) the note will sound colorful, and 3) struck on the drum will “pop out” and seem to resonate all around you. As a head goes bad, it begins to lose these characteristics: the pitch may not be well defined, the head sounds dull rather than vibrant, and the note no long pops out and projects all around you. In short, it sounds thuddier.
Other than listening to the tone quality of the head, you can try several tricks to assess the quality of the head. First, on the edge of the new drumhead (on the fleshhoop), write the date the head was installed. Under heavy use, the head might need to be changed twice a year. Under light use and if it is well maintained, it might last several years. 26-in and 29-inch drums usually need to be replaced sooner than 32-inch or 23-inch drums. If the drumhead is “out of date”, replace it. Second, clear or tune the head as much as possible. Third, strike the drum in the playing spot and listen for five seconds. If the pitch rises, falls or warbles, this is an indication that the head is bad or going bad. Fourth, a good timpani head has strong fifth partial. Hum a note into the head a fifth above the note of you put on the drum. If the head is good, the fifth will sing back to you strongly. If it is going bad, the fifth will not come out strongly at all. Fifth, if a struck note is a lifeless thud with little blossoming and ring, the head is ready to be replaced. Sixth, visually inspect the head for tears in the head, bubbles between the counterhoop and the bearing edge, and indentations from abuse. Finally, make an overall assessment of these six tests and replace the head as needed.
9. How to I get my timpanist to play softer?
For the young timpanist, playing louder means picking a very hard mallet and playing soft implies using a soft mallet. While it is perhaps easier to coax a loud and soft note using these sticks, the dynamic level comes not from the relative softness of the stick but from the length of the stoke.
At what height do you begin a stoke to achieve a certain dynamic level? Here is a rough guide:
Piano or less: 3″ or less
Mezzo forte: 6-9″
Forte and above: 12″ or more
If a student is having difficulty playing softly (something that goes beyond an egoistic desire to be heard), I find it useful to have the student practice playing softer and softer: start at 3″ above the timpani head, then 2″, then 1″, and then 1/2“. Each note played should sound softer than the preceding note because less energy is falling on the head. This exercise 1) develops the stick control to play softly, 2) focuses the student’s attention on playing softly, and develops a the student’s confidence in playing softly.
10. How do I get my timpanist to articulate a passage?
More often than not, if a conductor asks me to change my articulation, the conductor asks me to play more staccato. As timpanist Cloyd Duff of the Cleveland Orchestra once said, the timpani are legato instruments. Strike the timpani head and you get a sustained sound with no effort at all. As a result, it is relatively easy to produce a broad sustained legato note. The problem is producing short staccato notes. More thought and effort has to be put into playing staccato note. Here are several techniques to achieve this.
The first method is to make sure the timpanist is using a staccato stick and gripping and executing a staccato stroke. A staccato mallet usually is lighter, has a smaller head, and has less felt (covering) on the head. This mallet produces a more focused note. Tightening the grip of the stick and snapping the stick off the head reinforce the staccato sound of the mallet. The result is a more staccato sound. To get a staccato sound, the conductor simply needs to ask the timpanist to use a stick with a harder head and play in a staccato manner.
Second, the head has a playing spot roughly 4 inches in from the counterhoop; this varies with the size of the timpano. Playing in this spot will produce a nice legato tone. However, if the timpanist plays a little more toward the center of the drum, the sound becomes more staccato; but it loses some of its tone quality. Playing with a harder stick and with a staccato stoke in this area further accentuates the staccato effect. I find playing in the timpani head’s “staccato ring” is most effective for passages that are marked less than mezzo forte. The conductor need only ask the timpanist to play slightly more toward the center of the drum.
Third, when playing mezzo piano or less, the timpanist can play the note “into the drum” and without the rapid rebound used in a traditional staccato stroke. This effectively articulates the passage, especially if it is played in the “staccato ring” of the drumhead. For timpanists who understand this technique, the conductor need only ask them to play their note “into the drum”.
Fourth, muffling the drum with one’s fingers right after the note is played can shorten a legato note and turn it into a staccato note. This is effective at the end of phrases, but this technique cannot be used with a quick succession of notes. The conductor can simply ask the timpanist to muffle the note with their fingers.
Finally, mutes, commonly made from soft leather or felt, can be placed somewhere on the head to shorten the note. Mutes are commonly played within a 12″ diameter of the center of the drum. However, they can be placed progressively toward the edge of the drum to achieve greater and greater articulation. In so doing, the tone quality is of the note is radically changed and is generally useless. To have the timpanist a drum, the conductor can ask the timpanist to place the mute in the center of the drum-or wherever the conductor desires.
11. How do I clear (balance or tune) my timpani heads?
Clearing timpani heads is the process of making sure the timpani pitch is the same at each tension rod. If the tension is not the same at each tension rod, you will not get a well-defined pitch; over the course of 5 seconds, the pitch of the timpani will noticeably change; and the timpani will sound dull and will not project well. Therefore, it is necessary to clear the heads when they go out of tune. That involves seating the heads and adjusting the tension rods to ensure the same pitch each tension rod. In the following example, I will assume a 26″ timpano, a head that is in good condition, and a head that is mounted on the drum. You will need a mute, a head gauge, a tension gauge (optional), and a medium hard timpani stick. (A head gauge is a device placed on the top of the timpani head. An adjustable screw can be raised and lowered on the counterhoop. If the bottom of the screw is adjusted downwards below the current level of the counterhoop, all tension rods can be screwed down, lowering the counterhoop to the bottom of the screw. By adjusting each tension rod down to the bottom of the screw, the counterhoop is now an equal distance below the plane of the timpani head.)
- 1. Put the timpano on chairs where you can easily place your ear near the counterhoop. Kneeling on the floor works, but it involves a lot of getting up and down.
- Pitch the drum to the middle of its range; in this case a ‘d’.
- Place a mute in the middle of the drumhead. This mutes the note’s upper partials and makes it easier to identify the pitch of the drum.
- If you have a head that has been adjusted a lot, I find that it is good to re-level the head before clearing it by using a head gauge. If it is relatively clear, skip this step and go to step 5. Using a head (tap) gauge, tighten each tension rod (working opposite tension rods) so that the counterhoop at each tension rod is at an equal distance below the plane of the timpani head. This eliminates the scores of adjustments timpanists have made to the head and provides a foundation for clearing the head.
- If you have a tension gauge, adjust the tension at each tension rod so that the tension is equal at each tension rod. Go around a second time to ensure that the tension is the same.
- Whether or not you used a tension gauge in the last step, put your ear near the counterhoop and at the closest tension rod to the playing position, tap the drum head four consecutive times: 3 light, piano strokes followed by a mezzo forte stroke. When striking the head, listen to the lowest (not the highest) tone. If you notice a difference in the pitch between the three piano and then the mezzo forte notes, you know one of the pitch at one of the tension rods is sharp or flat. If there is no difference between the soft and loud notes, your head is clear or in tune. However, if the pitch on the stronger stroke is higher weaker strokes, there is a tension rod that is sharp and if the pitch on the stronger stroke is lower, there is a tension rod that is flat. If the difference between the notes is strong, the bad tension rod are the ones closet to or directly opposite you. If the difference between the notes is weak, the tension rod that is sharp or flat is roughly 90 degrees to your left or right.
- Put your ear by the tension rod that you think is sharp or flat relative to the tension rod at the playing position and gently tap the head near this suspicious rod. If it is the same pitch as the playing position tension rod, check another rod-starting with the rod opposite the suspicious tension rod. When you find the rod that is out of tune, check the tension rod immediate across from it because the opposite tension rod might be the tension rod out of tune. When you have confirmed which tension rod is out of tune, loosen (if it is sharp) or tighten (if it is flat) the tension rod 1/2 turn (on a school-line timpano).
- Go back to the playing position tension rod and complete steps 6 and 7 again. You may have to do this several times until all tension rods are at the same pitch.
- With your head cleared, it may be sharper or flatter than the ‘d’ you started out at. (If you use the head gauge, you lowered the counterhoop that raised the pitch of the drum.) Readjust the pitches on your tuning indicator to reflect the new pitches. If that will not work, you will need to turn all tension rods an EQUAL amount to bring the head down to the ‘d’ you started at.
- Your head is now clear. Strike the drum in the playing spot. You will hear a clear pitch with good tone color that blossoms and projects well.
No matter what tuning method you use, it is important to consistently use one procedure to clear your head. Trying this method “here” and that method “there” will result in frustration and a poorly cleared head.
Resources
- For a good discussion of changing and clearing timpani heads, see Tom Freer’s article at Percussion Source. While this article applies to professional timpani not discussed here, much of the discussion about changing timpani heads can be applied to school-line timpani.
- Mark Yancich has produced the best video on changing and clearing heads that clarifies what I have discussed here. It, and the head gauge described, here and can be bought at Professional Percussion Products.
- Timpanist John Tafoya, Indiana University, has a brief but authoritative discussion of how to replace timpani heads
- Richard K. Jones at Nebraska Wesleyan describes how to use a tension gauge and head gauge. See his website
12. Should I allow my timpanists to use tuning indicators?
Band directors are of two minds on this question. Some believe that their timpanists should tune by ear. This skill is essential the development of the timpanist, is expected at auditions, is needed at competitions, and is expected when a student encounters timpani with no indicator system. Students should be able to tune and retune their timpani in band or orchestral settings without relying on indicators. Others believe that the percussion student can use tuning indicators. Much contemporary music requires rapid tuning of several drums in quick succession. In these cases, and if the timpanist is going to play in tune, the use of indicators is essential. In private lessons, students learn to tune without using an indicator system.
I fall in the middle. In private lessons, young timpanists should learn how to tune and retune drums without the use of an indicator system, and they need to be able to do this in an ensemble setting. Indicators can be inaccurate and the ensemble can play sharp or flat. Thus, the timpanist will need to adjust the pitch of the drums to the evolving musical context. When they do use an indicator system, they need to know its limitations. They should consider indicators as guides to pitch, not THE pitch. Consequently, timpanists should rely on their ear training to finally set and confirm their pitches. The norm should be to rely on one’s ear to tune and retune timpani and to use an indicator system only when necessary and with pitches confirmed by ear.
Resource
For a handy downloadable interval recognition chart, see Vic Firth’s website and scroll down to “Timpani”
13. How do I negotiate competitions where I am unsure of the kind of timpani that will be used?
At competitions and festivals, timpani may or may not be provided. Where they are provided, very little information is usually distributed about the timpani. When it comes to competitions or auditions, it is reasonable for the timpanists to know something about the drums on which they will play. Where the organizers or authorities do not publish the specifications of the timpani, it is reasonable to ask them some questions: on what model of timpani will my students playing, how many and what sizes of timpani are provided, are all drums functional, is there an indicator system, do the timpani use a post and clutch, pedal, or ratchet pedaling system, who is responsible for clearing the heads, what adjustments to the timpani can my students make, can the timpani be tilted, and can we bring our own timpani? You may or may not get answers to these questions, but for the sake of your student’s sanity, they are worthy of being asked.
There are strong arguments for and against a school bringing their own timpani to a competition. On the one hand, schools should bring their timpani. Timpanists, like trumpeters, develop their own sound. In part, the timpanist’s sound is tied to the kind of drums they play and the mallets they use. Timpanists can demonstrate their talents, skills, and ear only if they play on instruments that allow them to project their sound. Therefore, it is reasonable to allow the school to bring its own drums. Furthermore, an ensemble’s sound, whether a percussion ensemble or a full concert band, is shaped by the instruments a conductor has at his or her disposal. As the timpani are an important part of any ensemble, bringing the school’s drums is a reasonable request. Finally, soloists and ensembles are often judged on the basis of tone quality, intonation, performance technique, and musicality. If a timpanist is to do well, they should play on instruments that enable them to rise to the highest level of performance. Normally, that means performing on their own drums. On the other hand, the most frequent opposing argument goes like this. Not all schools have the ability to bring their own drums. To treat all contestants fairly, timpanists should be put under equal liabilities-playing on a common set of timpani. Additionally, percussionists will run into this issue all their lives and they need to develop the skills and attitudes that will allow them to be successful in the future. Finally, space limitations make it impossible for every school to bring their own drums and the size of doors may make it impossible to get drums through them. Given these circumstances, the best we can do is to provide information on the kind of drums all contestants will use.
When a timpanist is required to play on an unfamiliar set of drums, the best thing a timpanist can do is to find out as much as they can about the drums they will perform on and practice accordingly. This may mean picking a piece that can be played on the drums available, tuning and retuning a piece by ear if there is no tuning mechanism on the drums, learning the piece by heart, find time to practice on the drums when get to the contest or festival site, and changing timpani sticks to elicit the sound timpanist want out of the timpani. If the timpanist is serious, lucky, or resourceful, s/he may find a local set of timpani on which to practice. All this sounds a bit bizarre; for the timpanist with aspirations to attend a conservatory after graduation, they need superior ratings. Playing on drums with which they are familiar can help them achieve that goal.
As a case in point, a friend of mine auditioned for the Philadelphia Orchestra. He asked to bring his own drums and was turned down for the usual reasons. Since his style and sound was much different from the drums he would be using and the sound he was expected to produce, he rebuilt his sticks and changed his playing style to elicit the sound that he thought the committee wanted to hear. While he made it into the final round, he did not secure the job; however, he felt that the changes he made for the audition made him competitive.
Biography
Steven L. Schweizer is a free-lance timpanist in the Carolinas. He has studied with Cloyd Duff and Paul Yancich, principal timpanists with the Cleveland Orchestra, and Mark Yancich, principal timpanist with the Atlanta Symphony Orchestra. He plays professionally and has served as timpanist with the Topeka Symphony Orchestra. He has taught timpani at Cornell College (Iowa), and his master classes have focused on timpani tone and the interpretation of the orchestral repertoire. He has recently published Timpani Tone and the Interpretation of Baroque and Classical Music, Oxford University Press, 2010